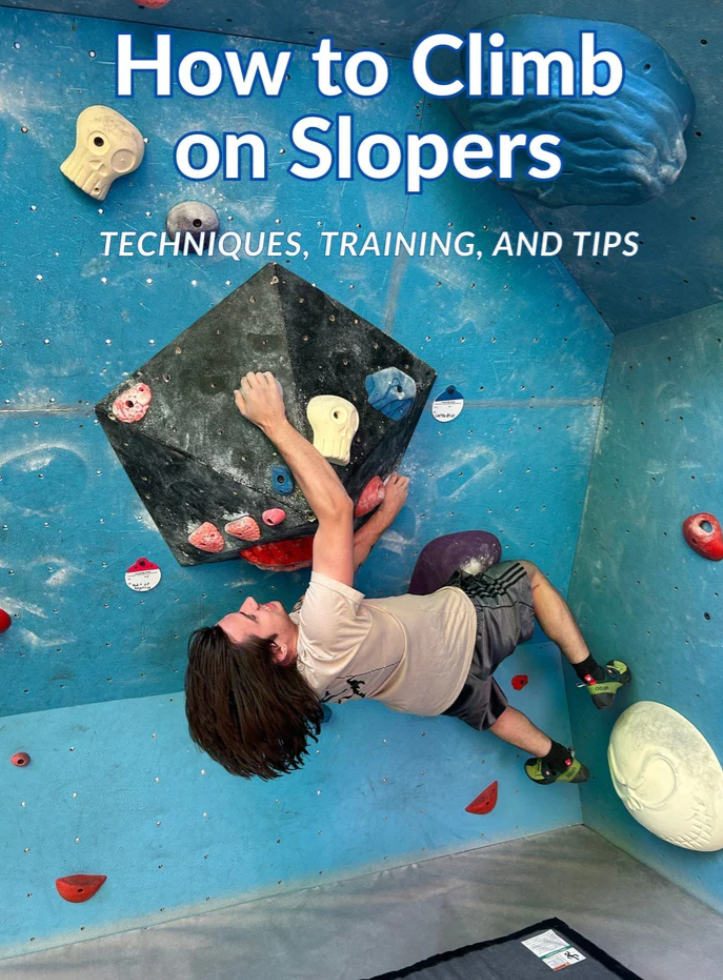
If you’ve ever stood at the base of a bouldering wall, stared up at a set of smooth, rounded slopers, and thought, “How do people even hold those?”—you’re not alone. Slopers are the ultimate humbler in climbing: they look deceptively simple, yet they test your technique, strength, and mental grit more than almost any other hold type. Unlike crimps (which rely on raw finger power) or jugs (which feel like a gift), slopers demand finesse—they’re all about friction, body positioning, and trusting your movement over brute force.
Whether you’re a beginner struggling to keep your hands from slipping or an intermediate climber looking to unlock sloper-heavy routes, this guide breaks down everything you need to know: the essential techniques to stick slopers, the best training to build sloper-specific strength, and pro tips to avoid common mistakes. Let’s turn those frustrating slips into confident sends.
First: What Are Slopers, and Why Are They So Hard?
Slopers are large, rounded holds with little to no positive edge—think of them as giant, smooth boulders or oversized domes sticking out of the wall. They range in size from a small melon to a basketball, and their sloped surface means there’s nothing to “grip” in the traditional sense. Instead, you rely on friction between your hand and the hold, combined with precise body tension, to stay attached.
The biggest mistake new climbers make with slopers? Gripping too hard. Unlike crimps, where squeezing tighter helps, over-gripping slopers wastes energy, tenses your forearms, and reduces your ability to adjust—all while increasing the chance of slipping. Slopers reward smarts over strength, and once you master the basics, they’ll go from intimidating to enjoyable (yes, really!).
Essential Sloper Climbing Techniques
Mastering slopers starts with nailing these core techniques—they’ll change how you approach every sloper hold, whether you’re on a slab or a steep overhang.
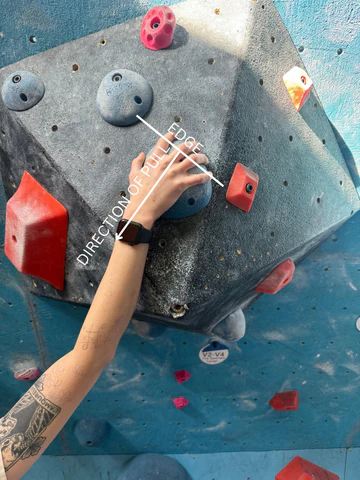
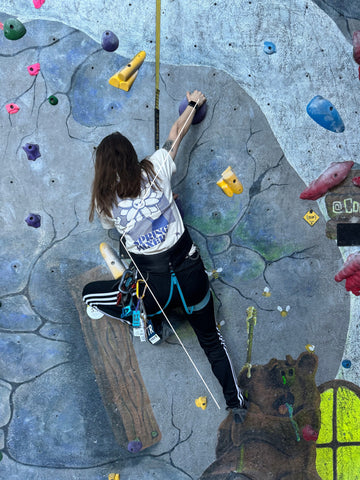
1. The Open-Hand Grip: Your New Best Friend
Forget crimping—slopers require an open-hand grip to maximize surface contact and friction. Cup your hand around the sloper as if you’re palming a basketball, spread your fingers slightly (but not too wide), and press the entire palm, fingertips, and even the base of your wrist into the hold. The goal is to cover as much surface area as possible—more contact = more friction = better grip.
Avoid bending your fingers too much (this turns an open grip into a weak crimp) and keep your wrists in a neutral position. On some slopers, you can even “meat hook” the top edge by wrapping your wrist over it—this engages larger forearm muscles and adds extra stability.
2. Body Position: Stay Close, Stay Low
Your body position is make-or-break for slopers. The key rule? Keep your center of gravity close to the wall and below the hold. Here’s how to do it:
- Sink your weight: Lower your hips and bend your knees to shift your weight into your legs. This takes pressure off your arms and keeps you balanced.
- Hips tight to the wall: Pull your hips toward the wall—imagine you’re trying to touch your belly button to the rock. This alignment keeps your weight over your feet and reduces strain on your grip.
- Straight arms (when possible): Bent arms tire quickly and pull your weight away from the wall. Keep your arms straight (but not locked) to distribute weight evenly and maintain tension.
- Lean strategically: If the sloper is angled, lean your hips away from the angle. This creates opposition and friction—leaning into the angle will make your hand slide right off.
3. Footwork: Precision Over Power
Slopers aren’t just about your hands—your feet are just as important for stability. Sloppy footwork will make even the easiest sloper feel impossible. Focus on:
- Quiet, precise placement: Place your feet deliberately (no slapping!) on footholds that give you a solid base. Use smearing (pressing the ball of your foot against the wall) if there are no obvious footholds—this creates friction to keep you stable.
- Push, don’t pull: Instead of pulling with your arms, push through your feet to move up. This shifts the work to your legs (which are stronger than your forearms) and preserves your grip strength.
- Matching hip direction: Align your hips with the direction of the sloper’s pull. This keeps your body balanced and reduces unnecessary strain on your hands.
4. Body Tension: The Secret Weapon
Slopers require full-body tension to stay stable. Engage your core, glutes, and legs to keep your body rigid—any sagging or wobbling will pull you away from the wall and make you slip. Think of your body as a straight line from head to heels: tight core, activated legs, and relaxed shoulders (tense shoulders waste energy!).
For steep overhangs, use heel hooks or toe hooks to pull your body closer to the wall—this takes pressure off your hands and gives you more control over the sloper.
Sloper-Specific Training: Build Strength That Sticks
Technique is key, but you’ll need targeted strength to hold slopers confidently. The best training for slopers focuses on forearm stability, grip strength, core engagement, and full-body tension. Here’s a sample routine to add to your climbing sessions:
1. Off-Wall Training: Build Foundation Strength
- Open-Hand Hangs: Use a hangboard or a large, rounded bar (to mimic slopers) and hang with an open-hand grip. Start with 10–15 second hangs, 3 sets. Gradually increase the time as you get stronger. This builds forearm endurance and trains your hand to maintain the open grip.
- Wrist Curls & Reverse Curls: Use light dumbbells to strengthen your wrist flexors and extensors—these muscles stabilize your grip on slopers. Do 3 sets of 12–15 reps for each exercise.
- Core Work: Planks, L-hangs, and leg raises build the core tension you need to stay close to the wall. Aim for 3 sets of 30–60 second planks, and 3 sets of 10–12 leg raises (hanging from a bar).
- Pinch Strength Training: Use pinch blocks or weights to build pinch strength—this complements sloper grip by strengthening the muscles that keep your hand closed around rounded holds. Do 3 sets of 10–12 pinches (hold for 5 seconds each).
- Heavy Roller Training: A heavy roller (like the one from Lattice Training) mimics the open-hand grip of slopers, engaging the same forearm and wrist muscles. Attach weights to the roller and perform wrist curls to build sloper-specific strength without wearing out your skin.
2. On-Wall Training: Practice Makes Perfect
- Sloper Traverses: Find a section of wall with slopers and traverse back and forth. Focus on technique (open grip, body position, footwork) over speed. Do 3–4 traverses, resting 1–2 minutes between each.
- Sloper Intervals: Use the “10-Minute Sequence” format: each minute, perform a mix of sloper hangs, pull-ups on slopers, and bent-arm hangs. Rest for the remaining time in each minute. This builds strength and stamina simultaneously.
- Easy Sloper Routes: Start with beginner-friendly sloper routes (V0–V2) to practice technique without overwhelming yourself. Focus on smooth, controlled movements—no rushing!
3. Recovery: Don’t Neglect Rest
Forearm muscles recover slowly, so avoid training slopers two days in a row. Use chalk to keep your hands dry (friction is key!), and moisturize your hands after climbing to prevent skin tears—raw skin makes slopers even harder to hold.
Pro Tips to Avoid Common Sloper Mistakes
Even experienced climbers make mistakes with slopers—here’s how to avoid the most common ones:
1. Stop Over-Gripping
This is the #1 mistake. Instead of squeezing the sloper, press into it with a relaxed open hand. Think of it as “cupping” the hold, not clamping it. Over-gripping tires your forearms fast and reduces your ability to adjust your position.
2. Don’t Ignore the Hold’s Texture
Before climbing, inspect the sloper from the ground to find the most textured areas (small dimples, rough spots). These spots offer extra friction—position your hand to cover them for a more secure grip.
3. Don’t Rush Moves
Slopers require patience. Take your time to establish your hand and foot placement before moving up. Rushing leads to sloppy body position and slips. Breathe, stay calm, and move deliberately.
4. Trust Friction (Even When It Feels Insecure)
Slopers often feel “slippery” at first, but friction is stronger than you think. If your hand feels like it’s sliding, check your body position (are your hips close to the wall?) before gripping harder. Trust the process—with practice, you’ll learn to feel secure on even the smoothest slopers.
5. Don’t Avoid Sloper-Heavy Routes
It’s tempting to skip routes with slopers, but the only way to get better is to practice them. Start small, focus on technique, and celebrate small wins (like holding a sloper for 5 extra seconds!).
Final Thoughts: Embrace the Sloper Grind
Slopers are challenging, but they’re also one of the most rewarding hold types to master. They teach you to climb smarter, not harder, and they’ll make you a better all-around climber—once you crack the code, you’ll look forward to sloper-heavy routes instead of dreading them.
Remember: technique comes first, strength comes second, and patience is key. Start with the open-hand grip, focus on body position, and train consistently. Before you know it, you’ll be sending slopers that once felt impossible.
Now go grab your chalk, hit the wall, and let those slopers know who’s boss. Happy climbing! 🧗